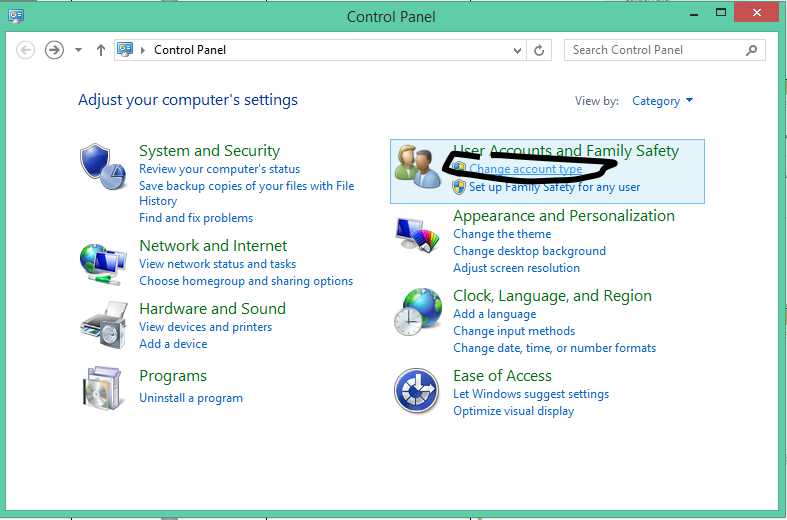
|
Right
Click the start menu
Click
“Control Panel”
|
 |
|
Click
“Change
account type”
|
 |
|
Click the
account
to change
|
 |
|
Click
“Change
the password”
|
 |
|
Type in
the new Password
Repeat it
Add A
Password
hint too
Then Click
“Change
password”
|
 |
|
The password has been successfully changed
|
|

Tuesday, 23 December 2014
Windows 8.1: Changing a Password
Arduino - Serial IO: Arduino works but then is not accessable in Windows
If you're writing a library that communicates to windows you might find that the Arduino becomes unavailable until you remove it and it steps up in the com port index.
Fix: You need a handshake between the Windows and the Arduino. The windows app needs to tell the Arduino to start sending data.
Why:
What is actually happening is if you're sending a constant stream of data, windows assumes it is a mouse and changes the driver!
Fix: You need a handshake between the Windows and the Arduino. The windows app needs to tell the Arduino to start sending data.
Why:
What is actually happening is if you're sending a constant stream of data, windows assumes it is a mouse and changes the driver!
Windows 8.1: How to Add a Local Account
User creation - Local Accounts
Right
Click the start menu
Click
“Control Panel”
|
 |
Click on
User Accounts and Family Safety
|
 |
Click on
“User Accounts”
|
 |
Click
Manage another account
|
 |
Add a new
user in PC Settings
|
 |
Click Add
an Account
|
 |
Click sign
in without Microsoft Account
|
 |
Click
“Local account”
|
 |
Enter your
login Details
Then Click
“Next”
|
 |
Select if
you require child filters
Then Click
“Finish”
|
 |
You have successfully added a new local
account
|
|
Windows 8.1: Updating Driver on an R9 290
Example: Installing device drivers post installation
Once you are windows right click the start menu and click device
manager
|
 |
Right click on devices with a “!” on top of them and click
“update device driver”
|
 |
And click Browse my computer and point the driver update at the
correct location
|
 |
Insert you manufacturer’s disc or have the downloaded driver file
available and point the driver installer at the right location.
Then click next
|
 |
Click OK and the end of the process
Repeat the process on all components that
do not have drivers installed
|
|
Windows 8.1: Installation Notes
Windows 8.1 minimum System requirements
·
Processor: 1 gigahertz (GHz) or faster with support
for PAE, NX, and SSE2
·
RAM: 1 gigabyte (GB) (32-bit) or 2 GB (64-bit)
·
Hard disk space: 16 GB (32-bit) or 20 GB (64-bit)
·
Graphics card: Microsoft DirectX 9 graphics device
with WDDM driver
Windows 8.1 Versions
Windows 8.1: This is the standard edition, and it
will run on desktops, laptops, and some tablets.
Windows 8.1 Pro: This gives you all of the features of
Windows 8.1, as well as some extra features intended for advanced users and
businesses. For example, people who need more security can use BitLocker
to encrypt their files.
You can buy windows online and create a flash stick or DVD disc. It is possible to upgrade from earlier
versions of windows to windows 8 without any discs too. I would recommend a fresh installation if you
want to maximise your performance potential.
Get windows 8.1
Boot process
Start the
computer with the flash stick or the DVD for windows 8 in the drive. If a windows 8 logo does not appear, you will
have to find specific information on how to enable a boot override to start the
setup from the media you have selected.
Be patient on the initial boot of the windows 8 disc, an image will sit
on the screen for quite a while. There
is no progress bar without an SSD or dated hardware in the installation
procedure can be slow to get started.
The computer will restart several times before launching the operating
system for the first use.
Sunday, 11 May 2014
Sainsonic Arduino Mega 2560 SD Card Shield SDFat Config
If you've tried to get your sainsonic SD shield to work with sdfat you would have probably read about people modifying there board to match the pins of software.
DON'T BE SO SILLY!
EVERY PIN CAN BE CONFIGURED!
1. Got to your arduino libraries folder and go to your SDFAT Folder
2. Open File SdFatConfig.h
3. Got the last few lines and change you're to match this -
#define USE_SOFTWARE_SPI 0
// define software SPI pins so Mega can use unmodified 168/328 shields
/** Default Software SPI chip select pin */
uint8_t const SOFT_SPI_CS_PIN = 53;
/** Software SPI Master Out Slave In pin */
uint8_t const SOFT_SPI_MOSI_PIN = 52;
/** Software SPI Master In Slave Out pin */
uint8_t const SOFT_SPI_MISO_PIN = 50;
/** Software SPI Clock pin */
uint8_t const SOFT_SPI_SCK_PIN = 51;
#endif // SdFatConfig_h
4. Now edit any SDFAT demo file to initialize on pin 53 -
sd.begin(53, SPI_HALF_SPEED)
Sainsonic Mega 3.2" TFT LCD Fault arduino Pixelation glitch won't display UTFT
Hi Guys,
I've had a few problems with my Sainsonic Arduino Mega 2560 board with the 3.2" Touch screen. Most of them are related to the undersized voltage regulator on it once it had got a bit hot a few times for too long.
By using my Freetronics Eleven boards regulator bridging to the Sainsonic board I have completely eliminated the glitched pixels while drawing, which once I had a big program running on the unit would become apparent.
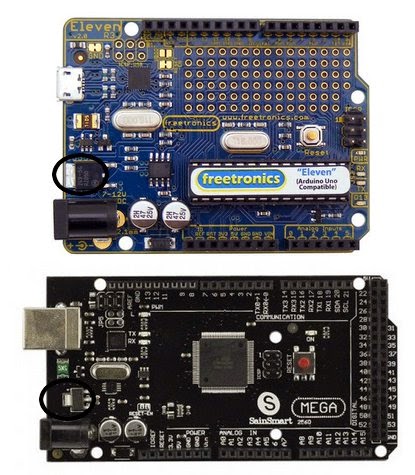
The Sainsmart Mega Board below can be seen with the smaller voltage regulator. You should also notice that it still retains reference layout for the pin holes around the regulator for convection and cooling, despite having a different size and location regulator...
You get what you pay for people! If you have a Sainsonic arduino mega product and have obvious screen draw errors, or a white screen I'd recommend upgrading to an external regulator and you probably have a much better experience with your unit.
Subscribe to:
Posts (Atom)